手机app端扫描二维码登录web端的解决方法,前后端分离,uniapp,基于token |
您所在的位置:网站首页 › uniapp 扫码签到 › 手机app端扫描二维码登录web端的解决方法,前后端分离,uniapp,基于token |
手机app端扫描二维码登录web端的解决方法,前后端分离,uniapp,基于token
|
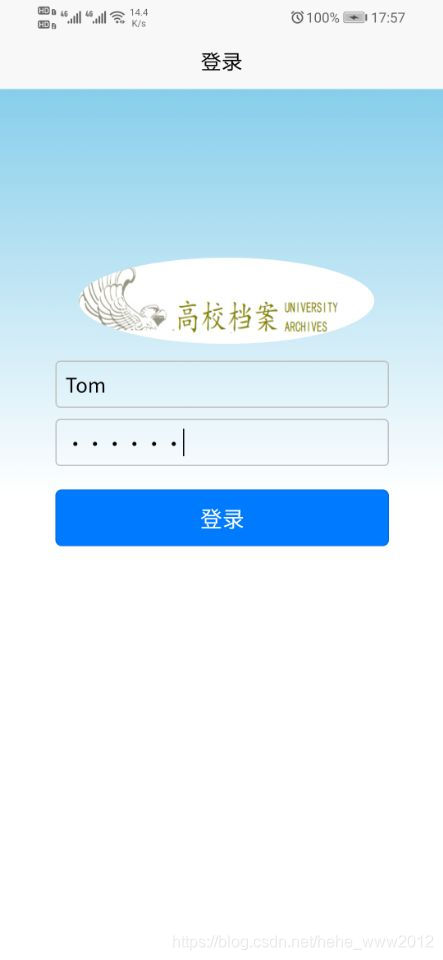
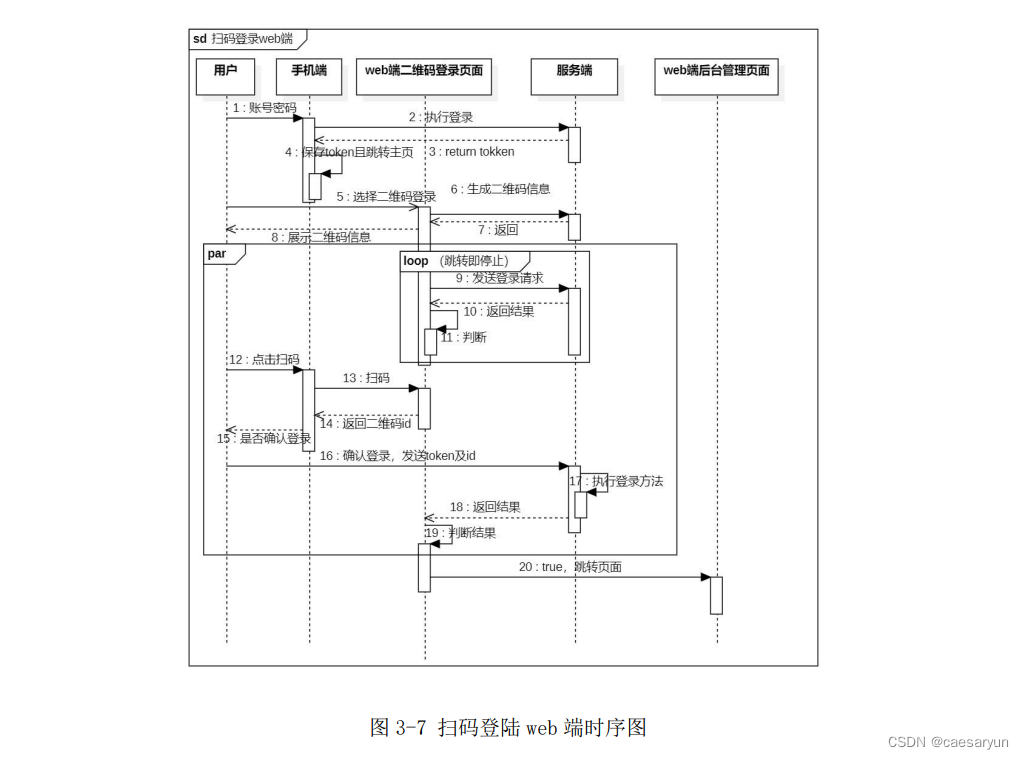
1.首先使用uniapp编写一个简单可以扫码的安卓app,其中需要登录的操作与web端可以使用同一个登录接口,且在手机端登录成功后,必须将得到的token进行保存,如先使用uni.request发送登录,然后得到服务端发送来的token,进行保存,可看一下:重要的是保存 token login() { uni.request({ url: "xxx", method: "POST", data:this.loginForm, success: (res) => { console.log("登录成功!!!!!!") console.log(res) //还需要保存token信息 if (res.data.code === 200) { uni.showToast({ title: '登录成功', duration: 2000 }); uni.setStorageSync("account", this.account) uni.setStorageSync("token",res.header.Authorization) uni.redirectTo({ url: "../index/main_show" }); } else { uni.showToast({ title: '用户名或密码错误', icon: "loading", duration: 2000 }); } }, }) }2. 使用 uni.scanCode 这个方法来扫描二维码,并解析到二维码中的内容,可看如下: uni.scanCode({ success: function (res) { console.log('条码类型:' + res.scanType); console.log('条码内容:' + res.result); //其中蕴含网址链接 console.log("执行访问条码上的链接.....") //如这个 链接 :http://xxxx?id=xxxx uni.request({ url: res.result, method: "POST", success: (res) => { console.log(res.data) console.log("执行完条码链接又得到了 Id") //将得到的二维码携带的id进行保存 uni.setStorageSync("tokenId",res.data) this.tokenId = uni.getStorageSync("tokenId") //之后跳转到 确认登录页面,即确认是否登录 uni.redirectTo({ url: "../index/sure_login" }); }, }) // void plus.runtime.openWeb(res.result,function(){ // console.log("跳转操作") // }); } });3.在 确认登录页面执行如下操作,其实就是 发送 数据,这里就是极其重要的地方了。 (1)发送 手机端得到的 token (2) 发送 从二维码解析得到的 id 代码如下:在url里面携带了token与id,但 可以注意到 携带了 header,这里熟悉shiro认证的就可以知道,这里又将token放在header里面后,后端会自动的进行用户认证的操作,而这个操作也是必不可少的。 //确认登录操作,发送二维码的 tokenId,与登录的token sure_login(){ uni.request({ url: "xxxx/sure_userinfo?token="+this.token+"&tokenId="+this.tokenId, method: "POST", header:{'Authorization':this.token, }, success: (res) => { console.log(res.data) }, }) },4.接下来就是后端的操作了,这里先简单讲一下,这个二维码登录的流程。 (1)首先web端,用户在未曾登录web端的情况,选择了二维码登录,而这个时候web端就从后端Fun1()方法获取了二维码,让用户选择使用自己系统的app即可上面的uniapp (2)而与此同时web端在出现了二维码后,便会一直定时的向后端FunctionX()方法发送请求,毕竟它不知道用户是否到底扫描了二维码 (3)而这个时候用户 在手机端已经登录过了,手机端自然也已经保存了相关的数据如token,然后选择手机端上扫描二维码登录的按钮扫描二维码,且通过二维码上的链接发送请求到后端的方法Fun3(),然后后端Fun3()将 二维码上的 id信息 发送给 手机端,而自然的手机端也进行了保存该id信息 (4)当完成扫码后,手机端又跳转到确认登录页面,然后用户选择 确认登录,当选择确认登录后,手机端发送请求 将 token及二维码的id都发送给后端的另一个方法Fun4()方法,在该方法中,保存二维码id、token,给后端定义的全局变量 二维码 的idTwo ,token,这里还有一个原始的 二维码id全局变量 id。 (5)是否还记得,之前 header里面携带了 token,所以在这里自然也完成了认证,所以可以从 这里获取到用户的 id及username,当然只要有token其实也ok,看自己的需求了 (6) 之后 全局变量 二维码idTwo与 FunctionX() 方法中的原始的 id进行比较,若一样则可以开始完成登录了,向web端发送相关的token信息,web端接收到信息,完成页面跳转,至此ok。 5.后端方法:1.生成二维码给web端 @RequestMapping("/getqrcode") public ResponseEntity getQRcode() throws Exception { System.out.println("生成二维码数据........"); tokenId = IdUtil.fastSimpleUUID(); String text = "http://192.168.0.102:8080/ArchivesSystem/common-accessborrow/login_qrcode?tokenId="+tokenId; // 嵌入二维码的图片路径 String imgPath = "D:/QRCode/MY-logo.png"; // 生成的二维码的路径及名称 String destPath = "D:/QRCode/qrc-login.jpg"; //生成二维码 ProduceQRCode.encode(text, imgPath, destPath, true); File imgfile = new File(destPath); byte[] imgbyte = OpenOfficeUtil.fileToByteArray(imgfile); HttpHeaders headers = new HttpHeaders(); headers.setContentType(MediaType.IMAGE_JPEG); ResponseEntity responseEntity = new ResponseEntity(imgbyte,headers,HttpStatus.OK); //将tokenId保存起来 // 解析二维码 String str = ProduceQRCode.decode(destPath); // 打印出解析出的内容 System.out.println(str); return responseEntity; }2. 向后端不断发送请求的 FunctionX()方法,tokenIdTwo即手机端发来的哪个二维码id,而tokenId即是原始的二维码id @RequestMapping("/login") public Result loginForQrCode(HttpServletResponse response) { System.out.println("我想要登录!"); //获取二维码 tokenId System.out.println("tokenId:" + tokenId); System.out.println("tokenIdTwo:" + tokenIdTwo); if(tokenIdTwo == null) { return Result.succ("nokey"); } if(tokenIdTwo.equals(tokenId)) { System.out.println("用户已经点击了确认登录,因tokenId值一样:tokenIdTwo: " + tokenIdTwo); System.out.println("tokenId: " + tokenId); System.out.println("userid: " + userid); System.out.println("username: " + username); response.setHeader("Authorization", shiroToken); response.setHeader("Access-Control-Expose-Headers","Authorization"); //登录成功,清除token tokenIdTwo = ""; tokenId = ""; return Result.succ(MapUtil.builder() .put("id",userid) .put("username",username) //将账户信息返回,还可以加其他信息 .put("msg","yes") .map() ); } else { return Result.fail("nokey"); } }3.用户扫码的方法: @RequestMapping("/login_qrcode") public String setInfo(String tokenId) { System.out.println("用户已扫码.........."); System.out.println("tokenId" + tokenId); //再将tokenId发送给手机端用户 return tokenId; }4.客户端确认登录访问的方法: @RequestMapping("/sure_userinfo") public Result sure_userinfo(String tokenId,String token) { System.out.println("确认登录,携带tokenId与认证的jwtToken......."); System.out.println(" qrcode tokenId:" + tokenId); System.out.println("shiro token: " + token ); //若不需要userid,username可不写 userprofile UserProfile userpro = (UserProfile) SecurityUtils.getSubject().getPrincipal(); tokenIdTwo = tokenId; shiroToken = token; //登录的token //将用户信息保存 userid = userpro.getUserId(); username = userpro.getUsername(); return Result.succ("ok"); }_________________________________________________________ 最后演示成果: 1. 2.
之后就ok了。 其中使用的web端 使用到的 轮番访问的方法如下: //进入这个页面就开始登录的请求 getLoopLogin(timeout = 15000){ this.polling = window.setInterval(() => { setTimeout(this.qr_login(), 0); }, 3500); }, //获取二维码信息,每次点开就获取一次即可 getQRcode(){ this.$axios({ method:'GET', url:this.dbURL+'/common-accessborrow/getqrcode', //responseType: 'arraybuffer' responseType: 'blob' }).then(res=>{ console.log(res) let a = document.createElement('a'); let blob = new Blob([res.data],{ //type:'application/pdf' //也是必不可少的 type:res.data.type }); let objectUrl = window.URL.createObjectURL(blob); this.codeImg = objectUrl console.log(this.codeImg) }); }, //请求登录,看看是否登录 qr_login(){ console.log("请求第 :" + this.num + "次登录..."); this.num++; const _this = this this.$axios.post(this.dbURL+'/common-accessborrow/login').then(res=>{ console.log(res) if(res.data.data == "nokey") { //Element.Message.warning("nokey!",{duration : 3*1000}); //this.$router.push("/qrcode_login"); } else if(res.data.data.msg == "yes") { Element.Message.success("成功登录!",{duration : 3*1000}); const jwt = res.headers['authorization'] const userInfo = res.data.data _this.$store.commit("SET_TOKEN",jwt); //保存token信息 _this.$store.commit("SET_USERINFO",userInfo) const isexcute = 0 //0表示第一次执行 _this.$store.commit("SET_ISGETMENU",isexcute); this.$router.push("/") } }) }, }, created(){ //轮番访问 // window.setInterval(() => { // setTimeout(this.qr_login(), 0); // }, 5000); this.getQRcode(); this.getLoopLogin(); }, beforeRouteLeave(to,from,next){ next(); console.log("终止轮询!") if(this.polling){ clearInterval(this.polling); this.polling = null; } },-------------------------------- 补充一个时序图:
|
【本文地址】
今日新闻 |
推荐新闻 |


